%20-%20PNG%20OK.png)
Using NexWins Kanban Board Template
1. Background
Kanban is a highly effective methodology for visualizing workflow, managing tasks efficiently, and ensuring smooth project progression. It provides clarity, allowing teams to see task statuses at a glance, and encourages continuous improvement by identifying bottlenecks and optimizing workflows. One of its key advantages is its flexibility—tasks can be adjusted dynamically without disrupting the entire process, making it ideal for both structured and evolving projects.
1.1 Kanban Origins
Kanban originated in Japan as a scheduling system developed by Toyota in the 1940s to improve manufacturing efficiency. Inspired by supermarket stocking methods, Toyota engineers created a visual workflow system using cards to signal production needs, ensuring that supply matched demand without waste. Today, Kanban is widely used in project management, software development, and business operations as a method for optimizing workflow efficiency1,2.
1.2 NexWins Kanban Board template
NexWins Kanban Board template is built in Excel for easy access and leverages this methodology by adding automation and real-time tracking, making it an excellent tool for project managers and project teams. By leveraging Excel capabilities, users can create tasks and move them between phases (such as Backlog, To Do, In Progress, and Done) with a few clicks, eliminating manual updates and reducing administrative workload. The automation ensures task limits are maintained, priorities are highlighted, and deadlines are managed seamlessly. For end users, an Excel-based Kanban board offers a simple yet powerful solution without requiring specialized software. For project managers and team members, it ensures visibility, accountability, and streamlined collaboration, helping teams stay on track and delivering projects more efficiently.
-
History of Kanban. (2024, August 6). Kanban Tool. https://kanbantool.com/kanban-guide/kanban-history
-
Using Kanban boards to support IT operations » Optimal Service Management. (n.d.). https://www.optimalservicemanagement.com/blog/using-kanban-boards-to-support-it-operations/

2. Kanban Board Template Overview
NexWins has developed its Kanban Board Template with the end user in mind, thus this template features a user-friendly interface with four distinct areas, as shown in the image below.

A brief description of each area and available functionality follows.
Columns: which represent the Stages or Phases in your workflow, currently the template supports up to four (4) stages. Default values are Backlog, To Do, In Progress and Done, but the user has the option to change those names via the Settings page.
Tasks Area: This is the area where the tasks are added and managed for workflow visibility. The information for each task is contained within a color-coded card under the assigned Stage or Phase. Each Card ID has five fields with information as follows:
Card ID: A three-digit system generated Card ID identifies the Phase to which the task is associated with. (This term is used interchangeably with Task ID, but note that any given task can change its ID number as it moves through the flow)
Task Name: User provided input that gives the Task a concise and descriptive label.
Assigned to: User provided input with the name of the person responsible for the task.
Due Date: User provided input indicating the target date on which the task shall be completed.
Priority: User selected input, indicating the priority assigned to a given task in the workflow, there are currently three priority levels defined in the template High, Medium and Low.
Action Panel: This area contains actions that can be executed by the User to manage the information in the Kanban Board Template. The following actions are available:
Add New Task: Allow the User to create a new task entry into the Kanban Board Template.
Edit Task: Allows the User to modify an existing task, allowing updates to Task name, assigned person, due date, priority, or stage.
Delete Task: Allows the User to remove a selected task permanently from the Kanban Board Template, ensuring data cleanup and accuracy.
Go to Filters: Allows the User to open the filter options to refine task visibility based on criteria like task name, assigned person, priority, or due date.
Reference Information Panel: This area contains links to actions that can be executed by the User to manage the information in the Kanban Board Template. The following actions are available:
Settings: Allows the use to configure preferences, adjust stage/phase name, and reset the template.
Instructions: Provides access to Kanban Board Template user guide (this document).
Copyright: Use this link to access information about Kanban Board Template usage permissions, disclaimers, etc.
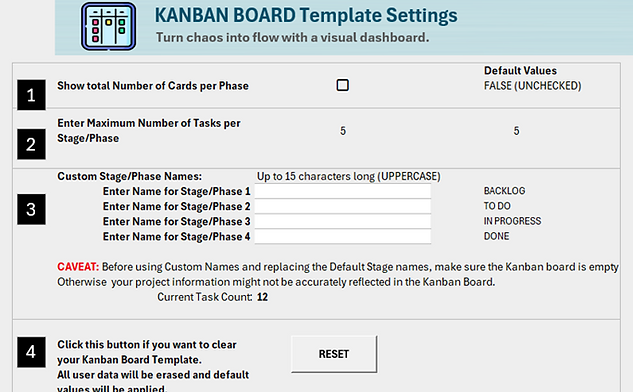
3. Settings Page
Before populating the Kanban Board template with your project tasks and initiating your workflow, it is highly recommended that you first configure your preferences in the Settings page. There are three customizable settings available:
- Show or hide the total number of cards (tasks) per column (stage/phase).
- Set the maximum number of cards (tasks) allowed per column (stage/phase).
- Customize the name of each stage/phase.
Additionally, there is a Reset button that allows users to erase all task data and restore the default values settings.
Please read below for more details on how to use each of these settings.
3.1 Show number of cards per phase
This setting enables users to view the total number of cards (tasks) in each column (phase/stage) directly below the column name on the Kanban Board. This is particularly useful when managing a large number of cards, as it eliminates the need to scroll down to check how many cards have been added per column.
To configure this setting, navigate to the Settings page and locate Option 1. Then, click the checkbox to enable or disable the feature.


Once the user enables this setting, Kanban Board Template will display the number of tasks per column, as shown in the image below:

3.2 Maximum number of tasks per column
This template allows you to configure a maximum of either 5 or 10 tasks per phase. At the beginning of your project, select the option that best fits your needs. (The default is set to a maximum of five tasks per phase.)
To configure this setting, navigate to the Settings page and locate Option 2. Then, from the Drop-down button, select the option that better works for you.

Warning: This setting should only be configured at the start of the project. If modified during execution, the Kanban Board template may not display tasks accurately. While increasing the limit from 5 to 10 tasks per phase during the project will not cause issues, reducing it from 10 to 5 may lead to display errors.
If your board reaches the limit tasks per column, you can try to apply some strategies to prioritize tasks effectively, for example:
• If one column reaches 5 (or 10) tasks, focus on completing tasks before adding new ones.
• If tasks are stuck, assess blockers and find solutions.
3.3 Customized column (phase) names
This template allows you to customize column (phase) names based on your project needs. You can define up to four custom column names. By default, the following column names are used: Backlog, To Do, In Progress and Done, but you can select if required column names that better fit your project workflow.
To configure this setting, navigate to the Settings page and locate Option 3. Enter custom names for your columns in the designated fields, keeping each name within the 15-character limit.

Please bear in mind that custom names should either be set at the beginning of the project or applied only after deleting all existing project data. This is because stage names are overwritten while tasks remain in the database, potentially causing issues with functionality such as task display, filtering, addition, and deletion. To avoid complications, ensure all tasks are cleared up before assigning new names.
Warning: This setting should only be configured at the start of the project. If modified during execution while the number of Tasks is not zero, the Kanban Board template will not display tasks accurately.
3.4 Reset Button
This Kanban Board template includes a Reset button. This button allows users to erase all task data and restore the default values settings. This is useful, for instance when starting a new project, changing column names, or when data inconsistencies arise due to modified settings. It ensures a clean slate by erasing user data and restoring default configurations, preventing errors in task display, filtering, etc. Before resetting, users should copy any valuable information to avoid unintended data loss.
To use the Reset button, go to the Settings page and locate Option 4. Click RESET button, then confirm your decision when the confirmation window appears.


Upon completion of the template reset, the user will be able to start a new project or simply start populating the Kanban Board again.

4. Naming Columns (Workflow Stages)
The first step in using this Kanban Board template is to name the columns, each representing a stage in your workflow. As mentioned earlier, this template supports four columns, corresponding to distinct phases of your process. The default column names are:
-
Backlog: Tasks that have not been started or need prioritization before entering the next stage.
-
To Do: Tasks that need to be started.
-
In Progress: Tasks currently being worked on.
-
Done: Tasks that are finished.
As detailed in section 3.3. of this document, you can customize these four stages based on your specific workflow needs.
5. Populating Cards (Tasks)
In this Kanban Board template each card represents an individual task. Depending on the maximum number of cards per column (See section 3.2) you can define a maximum of 5 or 10 tasks per Stage. To populate the cards, click the Add New Task button in the Action Panel.

Once you click on the button, a form will pop-up, you will be able to add a new task by completing each of the fields listed in the form.

Follow the sequence below to fill out the Add New Task form:
-
Assign a Task Name. Type the task name defined in your workflow. It should be descriptive enough for your needs, for example in some cases just entering “Task 1” or “Task A” should be enough to differentiate from other tasks in your workflow. However, in other instances you might need to enter something like: “Define API Endpoints.”
-
Assign a team member responsible for the task, by filling out the Assigned To field. Type the name of the person assigned to the task. Each task has only one person responsible for it, however one person can be responsible for several tasks.
-
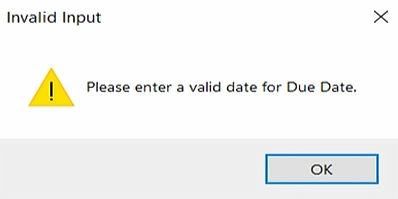
Add a Due Date for the task. Use the data picker next to the Due Date field. Select the desired date and then double click on it, to copy it in the Due Date box.

-
Set task Priority. From the Drop-down menu select the priority for the task. (e.g., High, Medium, Low).

-
Finally assign a Stage. From the Drop-down menu select the corresponding stage.

Make sure all fields are completed, and then click Submit.

A processing window will pop up, and when complete a confirmation window will appear. See images below.
Upon completion the following window will appear


Finally, the new card with the task information will appear in the corresponding Stage column on the Kanban Board. Please note that the system will automatically at a three-digit Card ID (Task ID) to provide a temporary reference for the newly added task.

6. Editing a Task
Most of the time, you will manage tasks in your workflow using the Kanban Board Template task editing functionality. This feature allows you to move tasks between stages, update priorities, modify due dates, assign owners, and even rename tasks. To access task editing options, click the 'Edit Task' button in the Action Panel.

The Edit Task Form will appear, and you will be able to select any task and edit its parameters.

To start, from Edit Task ID drop-down menu select the task to be modified:

Upon selecting the Task to be edited, the form will show the current values for each of the parameters defined for that Task.

Users can now change any or all the parameters in the New Value column, values will be entered in the same way used to add a task. (refer to Section 5). In the example below, the priority of a particular task is changing from Low to Medium. The corresponding New Value (Medium) has been entered in the form.

After all changes have been selected, the user will click Submit to execute the modifications. A processing window will pop up, and when complete a confirmation window will appear. See images below.


After the updates, the task Card will be shown in the Kanban Board Template, as illustrated in the image below.

7. Deleting a Task
When the need arises to eliminate a task from the workflow, Users will utilize Delete Task functionality. To access, simply click Edit Task button in the Action Panel.

A new window will pop up.
User must then select a Task ID from the Drop-down menu.


In this example, Task ID 103 has been selected for deletion. Keep in mind that the Task ID actually corresponds to the CardID in the Kanban Board Template database. When a task is deleted, if other tasks remain in the column (stage), the next task in line will inherit the deleted task's ID.
Once the User clicks Delete Task a confirmation window will pop up.


Upon confirmation (Click Yes), a processing window will pop up, and then a confirmation window will appear. See images below.


The following image illustrates the before and after of this process.

8. Using Filters
You can use Filtering functionality built into the form to quickly obtain information from the tasks listed in your Kanban Board. It is especially useful to help prioritize work progress, validate task priorities or identify workload, etc. To access, click Go to Filters in the Action Panel.

The Filters screen will appear, and the user will be presented with filter options. To filter tasks by any of the available criteria, from the Action Panel, click Set Filters.

The filters form will pop up, and from here the user can select up to five different criteria to apply.

8.1 Applying Filters
Filters can be used individually or in combination, up to five filters can be applied to the Kanban Board Template. Please read below details about each type of filter.
-
Filter by Task Name. Type the task name or a partial text string to filter by Task Name. Do not use wild cards
-
Filter by Assigned To. Select from the Drop-down menu the name of a resource to filter any tasks assigned to that person.

-
Filter by Due Date. You can filter Tasks by due date using several options. The Drop-down menu shows five options as follows:
-
Tasks due today
-
Tasks due with 7 days
-
Tasks due within 30 days
-
Tasks due within 90 days
-
Custom Data range
-

The first four options are directly applied in the Due Date field, while the fifth option (Custom Range) allows the user to establish a range of dates, using the date picker to select From/To dates.
Additionally, for reference, an informational box has been included in the Filters Form, the blue font text provides details about the earliest and latest due dates for Tasks currently added to the Kanban board database. This will help users when defining Due Date options or selecting a custom range.

For illustration purposes, below are two examples with Due date filters selected. The first example shows a direct option from the Drop-down menu:

And in this second example, shows a Custom Range filter:

Note: When using Custom range filtering, make sure that that From date is earlier than To date. Otherwise, an error message will be generated, upon clicking Submit.
-
Filter by Priority. From the Drop-down menu user can select a given priority to filter by.

-
Filter by Stage. From the Drop-down menu user can select a given stage to filter by.

Fill at least one filter criterion and the click Submit to apply filters. See below an example of a Filter form with all fields completed.

At this point, the User will click Apply Filters and if there are no entry errors, a processing message will pop up, and when complete the resulting filtered tasks will be shown. Also, to the left of the Filter page, information on which filters were applied will appear. See images below.

Below is a snapshot of filtered page full view, for the example applied

As indicated, for user reference, a list of Applied Filters appears to the left of the page. This functionality is useful to quickly identify what criteria were applied last time around. See next page for an expanded screen capture of Applied filters section.

And to the center of the page, the single task (Card ID 201) resulting from this filtering example is shown.

8.2 Clearing Filters
The Clearing Filters functionality removes all applied filters, resetting the page to its default state. This allows users to apply new filters or return to the main view.
To apply this functionality, just click Clear Filters in the Action Panel. Additionally, to return to the main page, click Go to Kanban Board.

9. Warnings and Error Messages
In the normal use of this Kanban Board template, from time-to-time Users may encounter errors such as invalid data entry or missing required fields. As reference, the following table summarizes those warnings and/or errors messages and provides details as to how to correct them to continue using the Kanban Board Template.
Warning/Error
Warning/Error Msg Box
Functionality
Details
All fields must be completed before submitting!

Add New Task
No Task has been selected. User needs to select a Task ID for deletion.
Please enter a valid date for Due Date.
Add New Task
Due Date format is invalid. Use date picker to avoid entry errors.
Please select a Task and at least one criterion before submitting.

Edit Task
No task was selected. User need to select a Task and at least one parameter to edit/update.
Invalid date format. Please enter in MM/DD/YYYY format.

Edit Task
Due date format is incorrect. Use date picker to avoid entry errors.
Please select a Task ID to delete.

Delete Task
No Task has been selected. User needs to select a Task ID for deletion.
Please enter at least one criterion before submitting.

Set Filters
No filter criteria have been entered. Please enter at least one filter criterion and then submit the form.
Error: ‘From’ date must be earlier than ‘To’ date.

Set Filters – Custom Range
When using Data Range for Due date filtering, the From: date must be earlier than the To: date
No matching records found. Please review your filter criteria.

Set Filters
Informational. The filter criteria use yield no results. User might want to review filter criteria.
10. Additional Support
If you have any questions, requests for customization or need additional support about this template or any of NexWins SmartProject templates, please contact us at: hello@nexwins.com


DISCLAMER: The templates and tools provided by NEXWINS, LLC are designed to support project management activities and are intended for use as a guide. While every effort has been made to ensure accuracy and completeness, NEXWINS, LLC does not guarantee that these templates will meet all project requirements. Users should tailor the templates to their specific needs and circumstances. NEXWINS, LLC is not responsible for any errors or omissions, or for any outcomes resulting from the use of these templates.